Creating a Header Layout with Elementor and Creativo
Using Creativo Elements and Elementor plugins, we can create custom Header layouts.
 Written by RockyThemes
After installing and activating Creativo theme, the site will have a generated Header and Footer area. The Header and Footer are auto generated from the Theme Options of Creativo.
Since Creativo version 7.7, we are able to build our own Custom Header Layouts and assign them to different post types – we have created a conditional setting which allows to decide the individual posts, pages, portfolio items or products that will be using these custom Header Layouts.
The building process is very easy thanks to the Elementor page builder and Creativo Elements.
You must have Creativo Elements plugin installed as well as the Creativo theme active. See this tutorial on how to Install, Activate and Update Plugins.
Creating the Header Layout
To create our first Header layout, navigate to your WordPress admin dashboard -> Creativo Elements -> Headers.

The Creativo Header Builder page will open up.
All the existing headers will be listed here. If this is a new installation of Creativo, the page will be blank.
Let’s create our new Header.
Click on Add New button.

Enter a Title for the new Header. Try using something descriptive: Global Header is a good name for our new Header which will be set for the entire site.

Next click on Publish.
The page will be opened with Elementor Editor.
Close all the sections on Elementor Navigator, but leave Creativo Header section open.

Add a new section by clicking the plus sign

Choose a layout/structure for the Section.
For this example let’s use a 2 columns layout – we want to have two elements: a logo on the left and the navigation menu on the right.

Click on the Elements button to access the Creativo Header elements again.

From the Creativo Header section, drag the Site Logo element to the left column.

Click on the Logo upload image and choose a Graphic Image that will be used as the logo.
Also upload a Retina Logo if you want your site to look perfectly on retina enabled devices – Apple devices.
Remember that the Retina Logo should be twice the size of your Default Logo. If your default Logo is 200×100, the retina logo should be 400×200.

Once the logo images have been set, navigate to the Elements section again and from Creativo Header, add Navigation Menu to the right column, by dragging and dropping the element inside the column.

Choose the menu to be used from the Layout -> Menu section.
Play around with the styling options of the Navigation Menu by going to the Style tab.

Under Style tab -> Menu Item Typography, we can choose a different font family. If the Default option is used, the Menu will inherit the Font Family set under Theme Options -> Typography area.
Edit the Menu Item Typography -> Line Height and choose 70.
This will make the menu items to have a height of 70px.

The menu looks good, but the Logo and the menu are not on the same line anymore.
To change that and have the Logo correctly aligned with the menu, we can edit the Section and set the elements to be centered align, vertically.
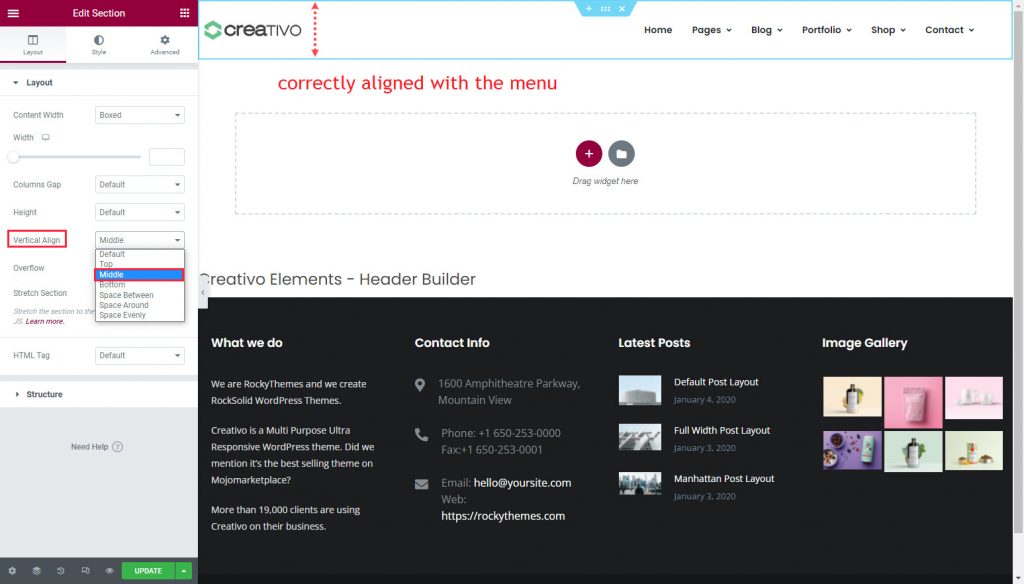
Under Layout -> Vertical Align -> choose Middle.
Now the Logo and the Navigation Menu are correctly aligned.
Update the Header and you are ready to go.
The new header will be automatically assigned to your entire site.