Migrating from WPBakery to Elementor means manually rebuilding your pages in Elementor, because no reliable automated converter exists. The full process takes seven steps: back up and stage your site, inventory your content, configure Elementor’s global styles, rebuild pages one by one, recreate your header and footer, test everything, then remove WPBakery safely.
This guide walks through the exact process we use at RockyThemes when we migrate client sites, from small business pages to WooCommerce stores. Follow it and you can do the entire migration yourself, without losing content, breaking your design, or hurting your SEO.
The migration at a glance:
- Back up everything and set up a staging site
- Take a complete inventory of your pages and plugins
- Install Elementor and configure global styles first
- Rebuild your pages one by one
- Rebuild your header, footer, and blog templates
- Test everything before you switch
- Go live and remove WPBakery safely
Can You Automatically Convert WPBakery to Elementor?
Converter plugins that promise an automatic WPBakery to Elementor migration do exist, but we do not recommend them: the converted pages come out with considerable design and functionality differences, and fixing them usually takes longer than rebuilding cleanly.
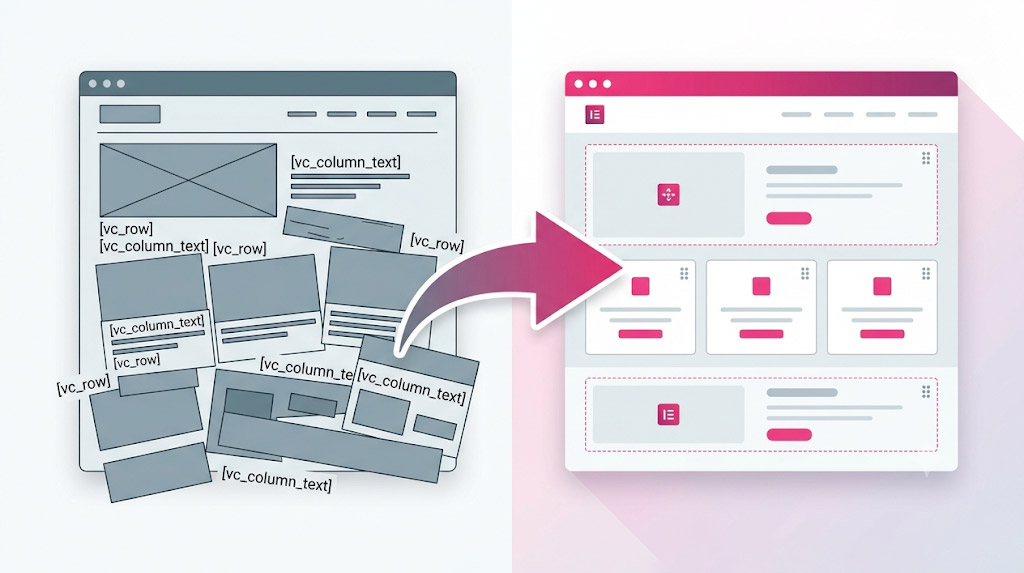
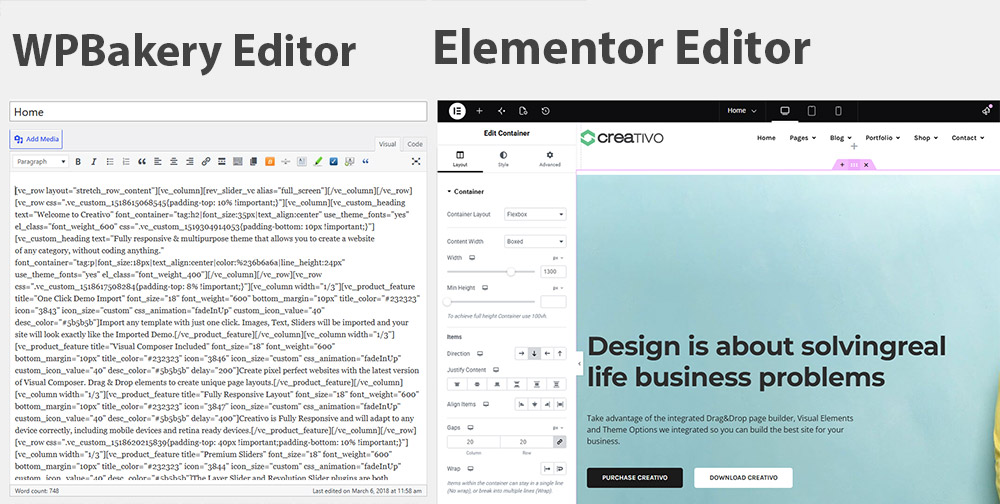
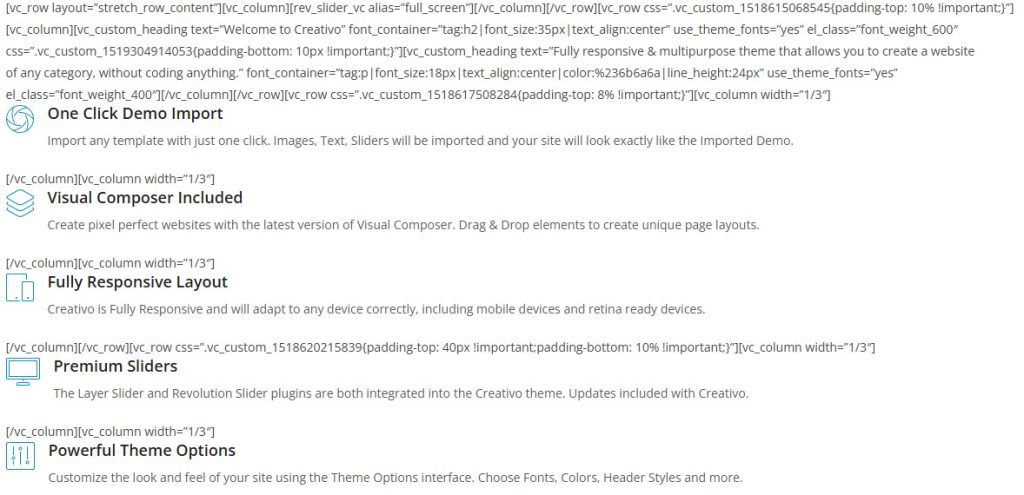
The limitation is structural, not a bug someone will eventually patch. WPBakery stores your layouts as shortcodes inside the page content itself: every row, column, and element becomes text like [vc_row][vc_column][vc_column_text].... Elementor works completely differently: it stores your design as structured JSON data in a separate database field, and renders it independently of the page content. An automatic converter can therefore only do one thing: map each WPBakery shortcode to the closest Elementor widget it knows about.
That mapping falls apart on everything beyond WPBakery’s standard element set, which in practice means most real-world sites:
- Theme-bundled custom elements. If WPBakery came packaged with your theme (the most common setup by far), the theme almost certainly added its own custom elements: portfolios, sliders, pricing tables, team grids, icon boxes. None of these exist in a converter’s mapping, so those sections come out broken, empty, or as raw shortcodes.
- Third-party addon packs have the same problem: hundreds of extra elements a converter has never heard of.
- Styling and responsive settings rarely translate one to one. Even sections that convert “successfully” need a manual design pass on every page, at every breakpoint, to look like the original.
So the realistic output of a converter plugin is a site-shaped rough draft that still requires page-by-page inspection and repair. Once you are committed to that manual work anyway, a clean rebuild is faster, more predictable, and it does not drag along years of accumulated markup bloat. That cleanup is a genuine benefit of migrating manually: most WPBakery sites we migrate shed a surprising amount of dead weight in the rebuild.
If you are still deciding between builders rather than committed to the move, read our WPBakery vs Elementor comparison first.
What You Need Before You Start
You need four things: a full backup, a staging environment, Elementor installed, and a realistic block of time. Nothing else is mandatory.
- A full backup of your files and database, stored somewhere off the server. UpdraftPlus or your host’s backup tool both work.
- A staging site, which is a private copy of your site where you rebuild without visitors seeing work in progress. Most hosts offer one-click staging; if yours does not, a local copy or a subdomain install works too.
- Elementor, Free or Pro. Free is enough to rebuild pages. You need Pro if you want to rebuild your header, footer, blog templates, or WooCommerce pages with Elementor’s Theme Builder. If your theme already provides good header and footer options, Free can carry you surprisingly far.
- Time. Budget realistic hours per page (there is a full breakdown later in this guide), and accept that the first page you rebuild will be the slowest.
One decision to make now: your theme. If your current theme bundles WPBakery and depends on it (common with older multipurpose themes), plan a theme switch as part of the migration. Pick something built for Elementor: a lightweight base like Hello Elementor, or a full theme with native Elementor support. Our own Creativo theme ships with 50+ Elementor widgets and supports both builders, which makes it a practical bridge during a transition because your old pages keep working while you rebuild.
Step 1: Back Up Everything and Set Up a Staging Site
Never rebuild directly on your live site. Create a full backup first, then do all migration work on a staging copy.
The backup protects you from the worst case. The staging site protects your visitors and your revenue: your live site keeps running on WPBakery, untouched, while you rebuild in private. When the new version is ready and tested, you switch. That is how you get a zero-downtime migration.
Practical setup:
- Take a complete backup (database plus files) and download it off the server.
- Create the staging copy through your host’s panel, or with a staging plugin.
- Password-protect the staging site or block it from search engines so Google never indexes the duplicate.
If your site changes daily (a shop with orders, an active blog), note the date you created staging. Content added to the live site after that date needs to be carried over before launch.
Step 2: Take a Complete Inventory of Your Site
Before rebuilding anything, list every page, template, and plugin involved, so nothing gets discovered halfway through the migration.
Your inventory checklist:
- Pages and posts built with WPBakery. Go through Pages and Posts in wp-admin. WPBakery pages show its editor when opened. On large sites, searching your content for
[vc_rowin the WordPress search or a database tool finds them all. - Templates and reusable sections, like global sections or saved layouts you reuse across pages.
- Custom post types: portfolios, testimonials, team members, anything your theme registered.
- Forms: which plugin powers them (Contact Form 7, WPForms, Gravity Forms) and where each form is embedded.
- Sliders and grids: Slider Revolution, Essential Grid, and similar addons often come bundled with WPBakery themes. Decide per item whether to keep the plugin or rebuild the element natively in Elementor.
- Custom CSS and code: check the Customizer, your theme options, and any code snippets plugin. Custom CSS written against WPBakery’s markup will need reviewing, because the class names it targets will no longer exist.
Write the list down with a status column. It becomes your migration tracker, and on any site beyond a handful of pages it is the difference between a controlled process and chaos.
Step 3: Install Elementor and Configure Global Styles First
Set up Elementor’s Site Settings (colors, fonts, buttons, layout widths) before rebuilding a single page. This one habit saves more time than anything else in this guide.
Open any page with Elementor, click the hamburger menu, and go to Site Settings. Configure:
- Global Colors: recreate your brand palette (primary, secondary, text, accent).
- Global Fonts: match your current headings and body typography, sizes included.
- Buttons: default styling that matches your current design.
- Layout: content width and default gaps, matched to your current site so rebuilt sections line up with the original.
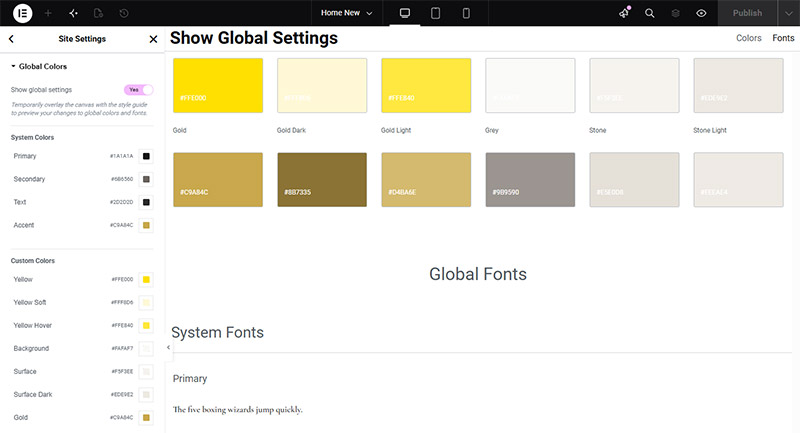
Why first: if globals are set, every widget you drop on a page already looks approximately right, and you style by exception. If globals are not set, you hand-style every single widget on every single page, then redo it all when something changes. We have seen DIY migrations double in duration for exactly this reason.
Step 4: Rebuild Your Pages One by One
Use the two-window method: original page open on one side of your screen, Elementor editing the new version on the other, and rebuild section by section from top to bottom.
The workflow that works:
- Start with a simple page, not your homepage. Your first page is where you learn Elementor’s editor; make the mistakes somewhere cheap. Rebuild the homepage once you are fluent.
- Rebuild structure first, polish later. First pass: get every section, heading, text block, and image in place. Second pass: spacing, animations, fine styling. Chasing pixel-perfection section by section is slower and demoralizing.
- Save repeating sections as templates. A call-to-action strip or a testimonial block that appears on six pages should be built once, saved as a template, and inserted everywhere else.
- Images are already in your Media Library. You are re-inserting them into widgets, not re-uploading. Re-check alt texts as you go; it is the one field easy to lose in the process.
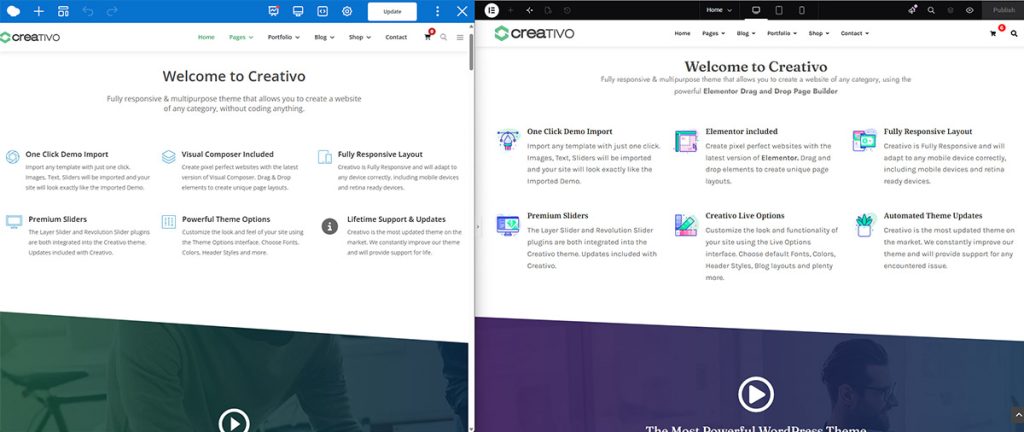
Most WPBakery elements have a direct Elementor equivalent:
| WPBakery element | Elementor equivalent |
|---|---|
| Row / Column | Container (or Section/Column on older setups) |
| Text Block | Text Editor |
| Single Image | Image |
| Button | Button |
| Accordion | Accordion |
| Tabs | Tabs |
| Separator | Divider |
| Empty Space | Spacer |
| Message Box | Alert |
| Google Maps | Google Maps |
| Video Player | Video |
| Post Grid / Masonry Grid | Posts widget (Pro) or Loop Grid |
| Raw HTML / Raw JS | HTML widget |
| Any plugin shortcode | Shortcode widget |
Third-party WPBakery addons will not always have a one-to-one match. For each one, decide: rebuild it with a native Elementor widget, replace it with an Elementor addon, or drop it because it was decoration you never needed.
Step 5: Rebuild Your Header, Footer, and Blog Templates
Your header, footer, and blog layouts come from your theme, not from WPBakery, so they need their own plan: either Elementor Pro’s Theme Builder or your theme’s native options.
Three routes:
- Elementor Pro Theme Builder: build the header, footer, single post template, and archive template visually, with full control. This is the cleanest route if you are moving to a minimal base theme like Hello Elementor.
- Your theme’s own header and footer: if you are keeping (or switching to) a theme with a solid header/footer builder, use it and let Elementor handle page content only. Elementor Free is sufficient in this setup.
- A hybrid: theme header and footer, Elementor Pro for single post and archive templates. Common and perfectly fine.
A note for Creativo users: if your site runs on our Creativo theme, this step gets significantly simpler. Creativo has supported WPBakery for years, so many long-time Creativo sites are built with it, and the theme now includes Creativo Elements, a dedicated Elementor companion plugin that adds Header, Footer, Blog, and Archive builders on top of Elementor Free (WooCommerce and Custom Post Type Loop builders are coming soon). That covers most of what Elementor Pro is normally needed for, so a Creativo site can be rebuilt entirely, templates included, without the Pro upgrade, and your existing WPBakery pages keep rendering while you work because the theme supports both builders side by side.
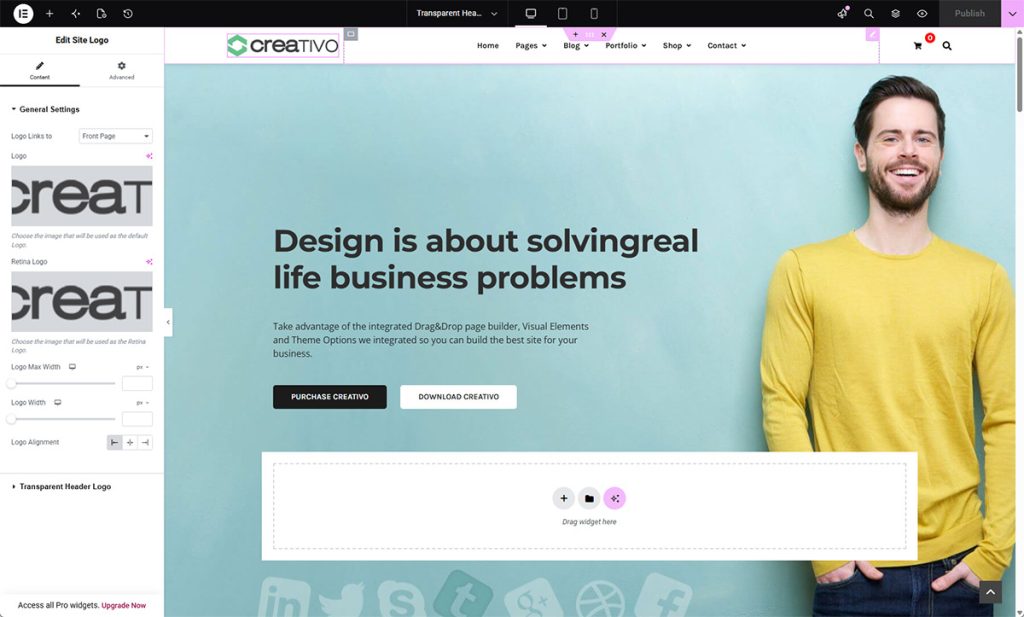
Whichever route you pick, rebuild these before final testing, because the header and footer appear on every page and any mistake in them multiplies across the site.
Step 6: Test Everything Before You Switch
Test every page on desktop, tablet, and mobile, submit every form, and click through every critical flow before the new site replaces the old one.
Your pre-launch checklist:
- Every page, three viewports. Use Elementor’s responsive mode for the first pass, then real phones for the pages that matter most. WPBakery and Elementor handle responsive breakpoints differently, and stacking order on mobile is the most common thing that silently breaks.
- Every form: submit each one and confirm the email or entry arrives.
- Navigation and internal links, including buttons deep inside page sections.
- WooCommerce flows, if you have a shop: product page, add to cart, checkout, account pages, order emails.
- Speed check: run the rebuilt site through PageSpeed Insights and compare with the old one. A clean Elementor rebuild is usually lighter than an aged WPBakery stack; if a page got slower, something (usually an unnecessary addon) came along that should not have.
- A second pair of eyes. After days of rebuilding, you stop seeing your own pages. Someone unfamiliar with the project will spot in minutes what you have scrolled past twenty times.
Step 7: Go Live and Remove WPBakery Safely
Push the rebuilt site live, verify it, and only then deactivate and delete WPBakery. The order of operations is what keeps this step safe.
- Launch the rebuilt site by pushing staging to live through your host, keeping every page on its existing URL. Same slugs means no redirects, no lost rankings, and visitors never notice the switch.
- Carry over anything created on the live site since you made the staging copy: new posts, new orders, form entries.
- Verify the live site with a quick pass of the Step 6 checklist. Caches (server, plugin, CDN) cleared first, otherwise you are testing the old site.
- Deactivate WPBakery, along with addons that existed only to serve it. Browse the site again: if any page suddenly shows raw
[vc_row]text, that page was missed in the rebuild (the next section covers the fix). - Delete the plugins once the site is confirmed clean, then regenerate Elementor’s CSS (Elementor, Tools, Regenerate CSS) and clear caches one final time.
Keep the pre-migration backup for at least a month. You will almost certainly never need it, which is exactly how backups should end their careers.
How Do You Fix WPBakery Shortcodes Showing After Deactivation?
Raw shortcodes like [vc_row] and [vc_column_text] appear when a page still contains WPBakery markup but the plugin is no longer active to render it. The fix is to rebuild that page in Elementor, or reactivate WPBakery until you do.
This is the single most common WPBakery migration problem, and it is worth understanding rather than just patching. WPBakery layouts live inside your page content as shortcode text. WordPress only knows what [vc_row] means while WPBakery is active. Deactivate the plugin, and WordPress prints the shortcodes literally, so your pages turn into walls of bracketed code with your text tangled inside.
What actually fixes it:
- If you are mid-migration: reactivate WPBakery. Nothing is lost; the page renders again. Finish rebuilding every page before deactivating, which is why removal is Step 7 and not Step 4.
- For a page already rebuilt in Elementor: shortcode residue on that URL means the old WPBakery version of the page is still the published one. Publish the Elementor version in its place.
- For stragglers found later (an old landing page, a forgotten blog post): rebuild them, or, if the page only ever held simple text, strip the shortcodes by editing the content directly.
A warning on shortcut solutions: mass-deleting [vc_*] shortcodes with regex or search-replace tools is dangerous, because your real text lives inside those shortcodes. Blind removal can eat content along with markup. If you attempt any bulk cleanup, do it on staging, from a fresh backup, and check pages afterward.
Will Migrating from WPBakery to Elementor Hurt Your SEO?
No, as long as your URLs stay the same and your content and heading structure are preserved. A builder switch changes how pages are constructed, not what Google reads on them.
The details that make it safe:
- Keep every slug identical. Same URLs means no redirects, no link equity lost, nothing for Google to re-evaluate beyond the page itself.
- Your SEO plugin data survives. Titles, meta descriptions, and schema from Yoast, Rank Math, or similar are stored per post, independent of the page builder. They carry over untouched.
- Preserve heading structure. Rebuild H1s and H2s as headings, not as styled text widgets. This is the most common SEO mistake in DIY rebuilds.
- Re-check image alt texts as you re-insert images.
- Watch Search Console for a few weeks after launch. Expect crawl activity as Google re-reads the pages; expect no ranking damage if the above held.
In our experience, rankings more often improve after migration than suffer, because the rebuilt pages are leaner and faster, and Core Web Vitals are a confirmed ranking factor. SEO protection is also the part clients worry about most, which is why it is a named guarantee in our migration service.
How Long Does a Manual WPBakery to Elementor Migration Take?
For a first-timer, plan roughly 2 to 4 hours per standard page, plus setup, templates, and testing. A typical 7-page site is a full week of evenings or two committed weekends.
Honest estimates, assuming you are new to Elementor:
| Task | First-timer estimate |
|---|---|
| Learning Elementor basics | 2-4 hours |
| Global styles setup | 1-2 hours |
| Simple page (text, images, a form) | 1-2 hours |
| Standard page (mixed sections, some styling) | 2-4 hours |
| Complex page (custom layouts, animations, grids) | 4-6 hours |
| Header, footer, blog templates | 3-6 hours |
| Testing and launch | 2-4 hours |
The curve is steep in the right direction: your fifth page will take a third of the time your first one did. Experienced builders compress all of this dramatically, which is why professional turnaround for a small site is around 5-7 business days including testing, and 10-14 days for larger sites with WooCommerce.
Should You Do It Yourself or Hire It Out?
Do it yourself if the site is small, you want to learn Elementor anyway, and nobody’s revenue depends on the timeline. Hire it out when the site is large, commercial, or built on WooCommerce.
The honest decision criteria:
DIY makes sense when:
- Your site is under roughly 10 pages with no shop.
- You will be the one editing the site afterward, so the Elementor fluency you build during migration pays off permanently.
- A stretched timeline costs you nothing.
Hiring makes sense when:
- The site has WooCommerce, custom post types, or dozens of pages, where the manual workload multiplies.
- The site produces revenue and a half-finished migration is a business risk.
- You want the design refreshed during the rebuild rather than cloned.
If you land in the second group, that is exactly what we do: pixel-perfect rebuilds with zero downtime and full SEO protection, with a fixed quote within 24-48 hours. See recent migrations we have completed or request a quote for your site.
Frequently Asked Questions
Do I need Elementor Pro to migrate from WPBakery?
No, Elementor Free is enough to rebuild your pages. You need Pro for the Theme Builder (custom headers, footers, blog and archive templates), the Form widget, and the WooCommerce Builder. Many migrations run on Free plus a theme that handles headers and footers. Creativo users get Header, Footer, Blog, and Archive builders through the theme’s bundled Creativo Elements plugin, so a full Creativo migration can run on Elementor Free.
Can WPBakery and Elementor run on the same site at the same time?
Yes, and during a migration they should. Each page uses one builder or the other, so your old pages keep rendering with WPBakery while new ones are built with Elementor. Just never edit the same page with both builders, and remove WPBakery only after the last page is rebuilt.
What happens to my images during the migration?
Nothing. Your Media Library is independent of any page builder, so every image stays exactly where it is. You re-insert images into Elementor widgets as you rebuild, which is also the right moment to fix missing alt texts.
Will my contact forms keep working?
Yes. Form plugins like Contact Form 7, WPForms, and Gravity Forms are independent of the page builder. Your forms, entries, and settings all survive; you simply embed each form in the rebuilt page using its widget or the Shortcode widget.
My theme came with WPBakery bundled. Can I keep the theme?
Usually not, and usually you should not want to. Themes that bundle WPBakery tend to depend on it for their demo layouts and custom elements, so they fight you after the switch. Moving to an Elementor-native theme as part of the migration gives you a cleaner result and better long-term support.
Is it better to migrate to Gutenberg instead of Elementor?
For a simple blog, Gutenberg is a legitimate lightweight option. For design-heavy business sites, landing pages, and WooCommerce stores, Elementor’s visual control, templates, and ecosystem are still well ahead, which is why it remains the most popular destination for WPBakery migrations.
Rather have your site migrated for you?
We rebuild WPBakery sites in Elementor with pixel-perfect precision, zero downtime, and full SEO protection. Fixed quote within 24-48 hours.